
Stripeで簡易なECサイトをサーバーレスに実装する
はじめに
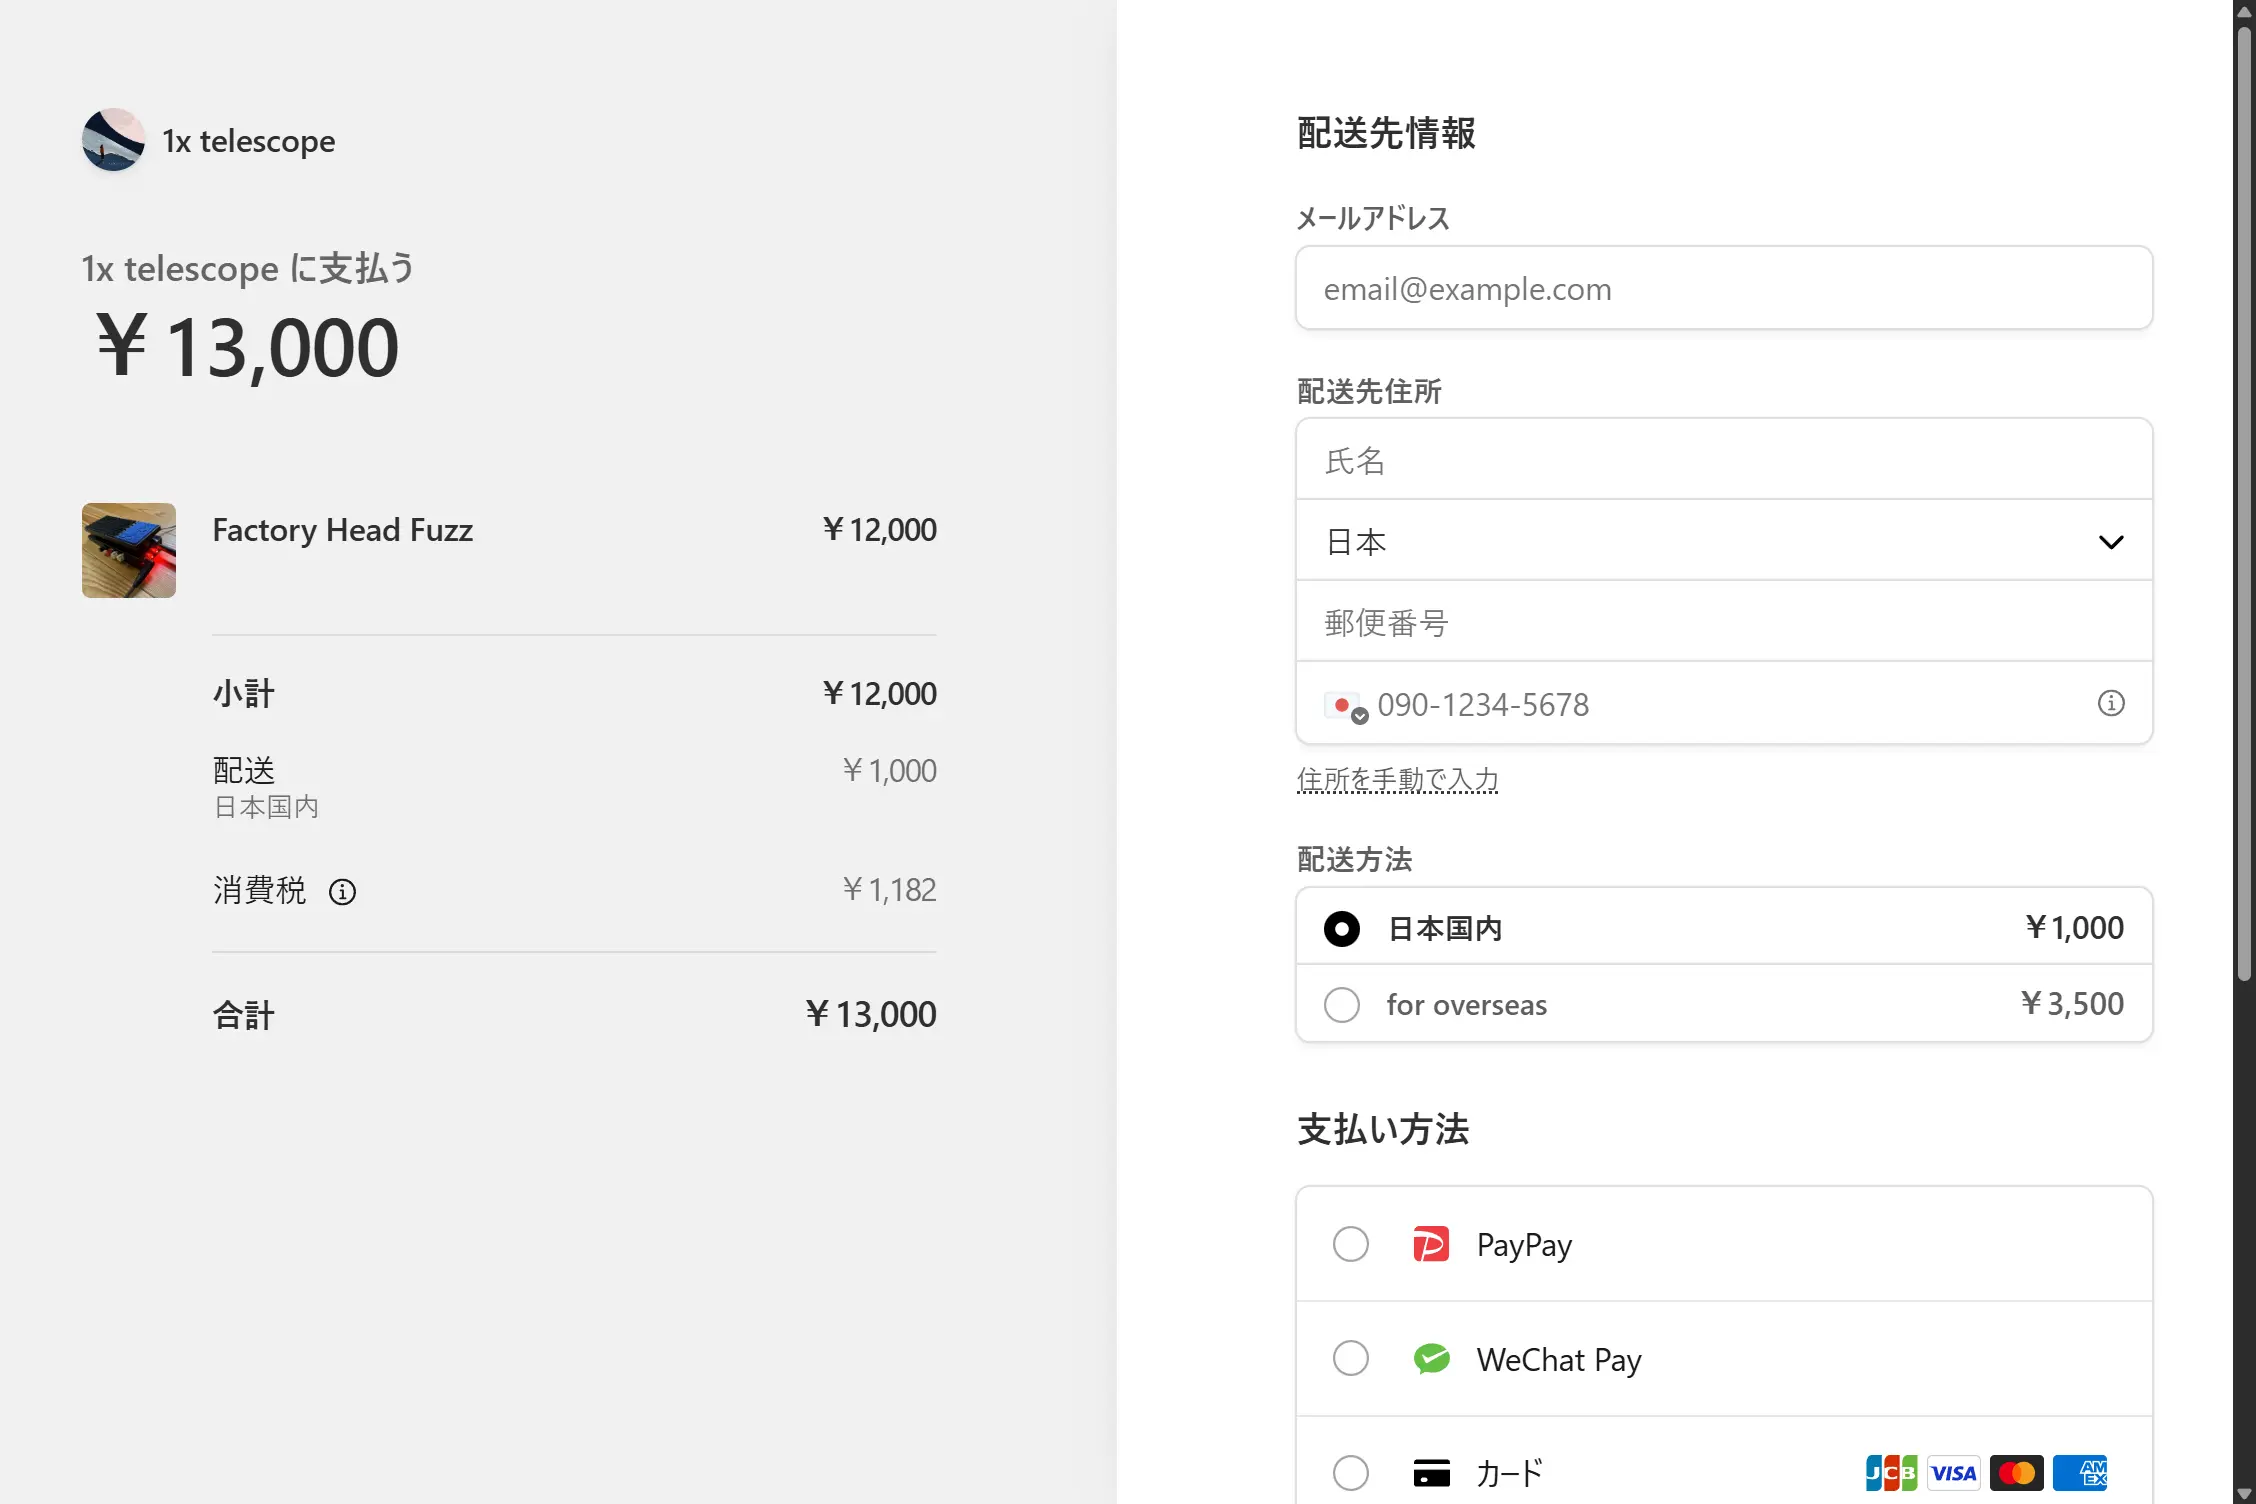
1x telescope 公式サイトの各製品ページにStripeの購入ボタンを設置し、他のECサイト等に飛ぶことなくダイレクトに商品を購入できるようにしました。

そう珍しい方法でもないとは思いますが、
- Stripe Webhook
- Netlify Functions
- GitHub Actions
を連携して在庫の表示と更新までサーバーレスに実装できたので、その構成をざっくりまとめておきます。なお当該のGitHubリポジトリは流石にPrivateです、悪しからず。
個人的な思想の話
「公式サイトを運営しつつ決済のためにECサイトも利用する」というケースは2026年現在そう珍しいものでもないと思いますが、個人的に
- 製品ページがインターネット上に2つ存在することになる
- それらの管理が一元的でない
- 公式サイトからECサイトに飛ばされると購入時の体験があまり良くない
といった不満があり、公式サイトで直接買い物できるのが一番良いという思想を持っていました。しかしそのためには、一般的には(方法はどうあれ)サーバーを建てて管理する面倒が生じます[1]。
そこで、何とかサーバーレスになんちゃってECサイトを実装できないか?と考えた結果、今回ご紹介するスタイルに辿り着いたという次第です。
環境
- Netlifyの静的ホスティングサービスに[2]
- サーバーサイドレンダリングなサイトを
- GitHub経由でデプロイしている
構想
諸々の動きは次の図の通りです。それぞれのステップについてソースコードなど貼りつつ説明していきます[3]。
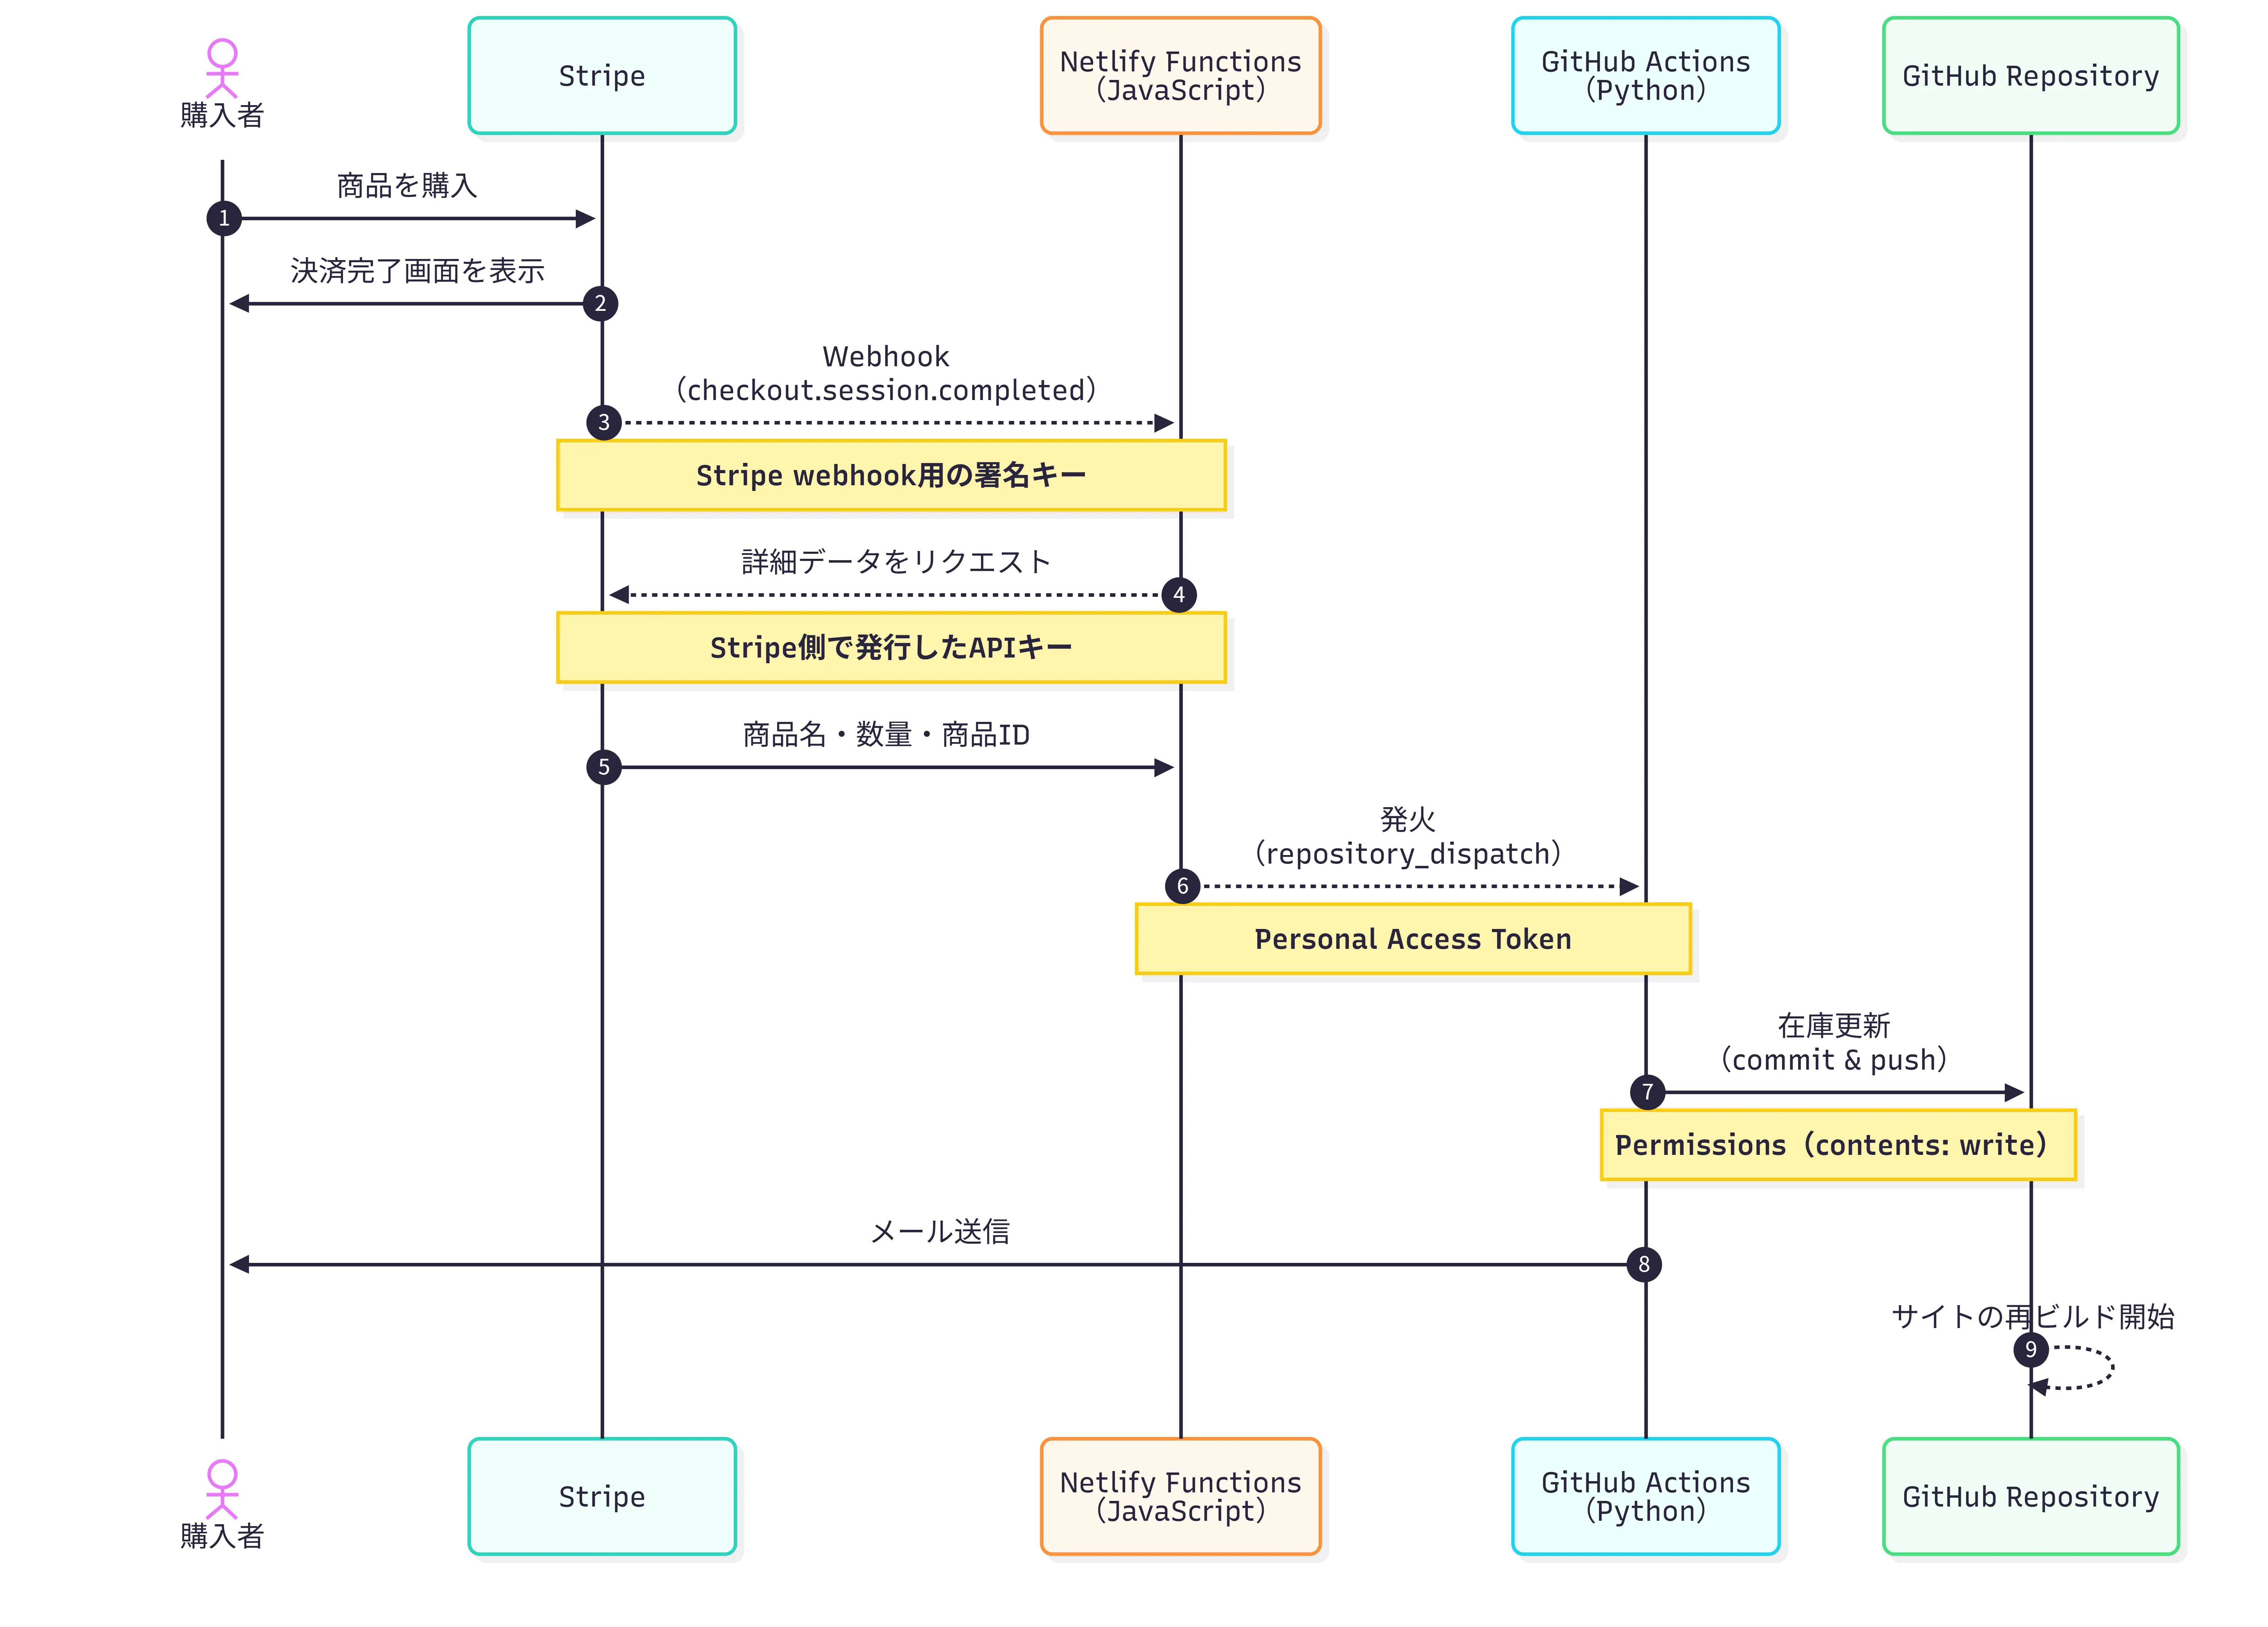
Stripe
Webhook
送信先を追加する
Stripeのダッシュボードから「設定」「Payments」と進んで、ページの一番下の「次のステップ」にある「Webhookを設定」クリックします。するとワークベンチとやらが下からニュッと現れるので、「+送信先を追加する」をクリックして以下のように設定します。
| 項目 | 値 |
|---|---|
| イベントのリッスン先 | 「お客様のアカウント」 |
| APIバージョン | (デフォルト) |
| イベント | checkout.session.completed |
| 送信先のタイプ | 「Webhookエンドポイント」[4] |
| 送信先名 | (任意に決める) |
| エンドポイントURL | https://example.com/.netlify/functions/stripe-webhook |
署名キー
ここで「署名シークレット」なるwhsec_***...みたいな秘密鍵が発行されるので、手元に控えておきます。
APIキー
ダッシュボードに戻って、「開発者」「APIキー」「APIキーの管理」と進んで「制限付きのキー」を発行します。このとき権限は以下のように設定します。
| 項目 | 値 |
|---|---|
| このAPIキーの使用方法 | 「このキーを別の ウェブサイトに提供」 |
| 名前 | (任意に決める) |
| URL | https://example.com/.netlify/functions/stripe-webhook |
| このキーに対する権限をカスタマイズする | ☑ |
| 項目 | 権限 |
|---|---|
| Checkout | 読み取り |
| Webhook | 読み取り |
| 他 | なし |
Netlify Functions
サーバーレス関数
GitHubリポジトリのnetlify/functions/ディレクトリに以下のファイルを入れておきます。心得のある人はPythonやC#で書いても良いみたいです。
const stripe = require('stripe')(process.env.STRIPE_API_SECRET)
const GITHUB_OWNER = 'your-github-username' // GitHubのユーザー名
const GITHUB_REPO = 'your-repo-name' // GitHubの当該リポジトリ名

exports.handler = async (event) => {
  // POSTメソッド以外は拒否
  if (event.httpMethod !== 'POST') {
    return { statusCode: 405, body: 'Method Not Allowed' }
  }

  const sig = event.headers['stripe-signature']
  let stripeEvent

  try {
    // 署名(STRIPE_WEBHOOK_SECRET)を検証
    // Stripeからのリクエストであることを確認
    stripeEvent = stripe.webhooks.constructEvent(
      event.body,
      sig,
      process.env.STRIPE_WEBHOOK_SECRET
    )
  } catch (err) {
    console.error(`Webhook Error: ${err.message}`)
    return { statusCode: 400, body: `Webhook Error: ${err.message}` }
  }

  // 決済完了イベント(checkout.session.completed)の処理
  if (stripeEvent.type === 'checkout.session.completed') {
    const session = stripeEvent.data.object

    try {
      // STRIPE_API_SECRETの権限で、決済時の情報を取得
      const lineItems = await stripe.checkout.sessions.listLineItems(session.id)

      const itemsPurchased = lineItems.data.map((item) => ({
        name: item.description,
        quantity: item.quantity,
        sku: item.price.product // Stripeで設定した商品ID
      }))

      // GitHub Actions(Repository Dispatch)を起動
      const githubResponse = await fetch(
        `https://api.github.com/repos/${GITHUB_OWNER}/${GITHUB_REPO}/dispatches`,
        {
          method: 'POST',
          headers: {
            Authorization: `Bearer ${process.env.GITHUB_TOKEN}`,
            Accept: 'application/vnd.github.v3+json',
            'Content-Type': 'application/json',
            'User-Agent': 'Netlify-Functions'
          },
          body: JSON.stringify({
            event_type: 'stripe_payment_success',
            client_payload: {
              items: itemsPurchased,
              email: session.customer_details.email
            }
          })
        }
      )

      if (!githubResponse.ok) {
        const errorText = await githubResponse.text()
        throw new Error(
          `GitHub API error: ${githubResponse.status} ${errorText}`
        )
      }

      console.log('GitHub Actions triggered successfully')
    } catch (err) {
      console.error('Processing Error:', err)
      return { statusCode: 500, body: 'Internal Server Error' }
    }
  }

  // Stripeへの成功レスポンス
  return {
    statusCode: 200,
    body: JSON.stringify({ received: true })
  }
}コメントアウトから察せられるかと思いますが、Stripe上で決済が完了したとき
- 売れた商品の情報
- 購入者のメールアドレス
といった情報を受け取ってGitHub Actionsに投げる、中継所のような役割を担っています。
GitHub PAT
GitHubのアカウントメニューから「Settings」「Developer settings」と進んで、Personal access token: PATを発行します。
| 項目 | 値 |
|---|---|
| 種類 | Fine-grained tokens |
| Token name | (任意に決める) |
| ... | ... |
| Repository access | Only select repository (当該リポジトリを選択) |
| Permissions | ☑ Actions (Read and write) |
環境変数の登録
Netlifyにログインして、プロジェクトの「Environment Variables」に諸々の秘密鍵を登録します。
| 変数名 | 中身 |
|---|---|
GITHUB_TOKEN | 先ほどのPAT |
STRIPE_WEBHOOK_SECRET | 先ほどの署名キー |
STRIPE_API_SECRET | 先ほどのAPIキー |
GitHub Actions
ここまでで全部のサービスの連携が完了しました。あとはGitHub Actionsをrepository_dispatchで発火させて、好きな動作をさせるだけです。
一例として、1x telescopeでは
- 在庫数の更新
- 購入者へのメール送信
をPythonスクリプトで実行しています。
name: stripe-webhook

on:
  workflow_dispatch:
  repository_dispatch:
    types: [stripe_payment_success]

permissions:
  contents: write

jobs:
  update-stock-and-send-email:
    runs-on: ubuntu-latest
    steps:
      - name: Checkout main branch
        uses: actions/checkout@v5
        with:
          ref: main
          fetch-depth: 0

      - name: Update md files
        env:
          PAYLOAD_ITEMS: ${{ toJson(github.event.client_payload.items) }}
        run: |
          echo "Items purchased: $PAYLOAD_ITEMS"
          python3 script/update_stock.py

      - name: Commit and push changes
        uses: stefanzweifel/git-auto-commit-action@v7.0.0
        with:
          branch: main
          commit_message: 'docs: Update stock'
          commit_user_name: 'gh-actions[bot]'
          commit_user_email: 'action@github.com'
          commit_author: 'gh-actions[bot] <action@github.com>'

      - name: Send email to customer
        env:
          PAYLOAD_EMAIL: ${{ github.event.client_payload.email }}
          SMTP_PASSWORD: ${{ secrets.SMTP_PASSWORD }}
        run: |
          echo "Send email to customer..."
python3 script/send_email.pyimport os
import json
import re
def update_stock():
# 環境変数からJSONデータを取得
payload_json = os.environ.get("PAYLOAD_ITEMS")
if not payload_json:
print("No payload items found.")
return
items = json.loads(payload_json)
# 日本語ページ
for item in items:
# 購入された商品のmdファイルを特定
name = item.get("name")
quantity = item.get("quantity", 0)
sku = item.get("sku")
sku_map = {
"prod_***": "docs/products/test.md",
"prod_***": "docs/products/Downpour.md",
"prod_***": "docs/products/Downpour-mini.md",
"prod_***": "docs/products/Downpour-in-BOSS.md",
"prod_***": "docs/products/FactoryHeadFuzz.md",
"prod_***": "docs/products/6500Delay.md",
}
file_path = sku_map.get(sku)
if not file_path:
print(f"Unknown SKU: {sku}. Skipping...")
continue
else:
print(f"Processing SKU: {sku} -> {file_path}")
# mdファイルを読み込んで在庫を更新
if os.path.exists(file_path):
with open(file_path, "r", encoding="utf-8") as f:
content = f.read()
# 「**在庫:n**」を正規表現で検索して更新
match_stock = re.search(r"\*\*在庫:(\d+)\*\*", content)
current_stock = int(match_stock.group(1))
new_stock = max(0, current_stock - quantity)
content = re.sub(r"\*\*在庫:\d+\*\*", f"**在庫:{new_stock}**", content)
with open(file_path, "w", encoding="utf-8") as f:
f.write(content)
# 在庫が0になった場合は購入ボタンをコメントアウト
if current_stock > 0 and new_stock == 0:
content = re.sub(
r"(<stripe-buy-button.*?</stripe-buy-button>)",
r"<!-- \1 -->",
content,
flags=re.DOTALL,
)
with open(file_path, "w", encoding="utf-8") as f:
f.write(content)
else:
print(f"Error: File {file_path} not found. Skipping...")
# 英語ページ
for item in items:
# 購入された商品のmdファイルを特定
name = item.get("name")
quantity = item.get("quantity", 0)
sku = item.get("sku")
sku_map = {
"prod_***": "docs/en/products/test.md",
"prod_***": "docs/en/products/Downpour.md",
"prod_***": "docs/en/products/Downpour-mini.md",
"prod_***": "docs/en/products/Downpour-in-BOSS.md",
"prod_***": "docs/en/products/FactoryHeadFuzz.md",
"prod_***": "docs/en/products/6500Delay.md",
}
file_path = sku_map.get(sku)
if not file_path:
print(f"Unknown SKU: {sku}. Skipping...")
continue
else:
print(f"Processing SKU: {sku} -> {file_path}")
# mdファイルを読み込んで在庫を更新
if os.path.exists(file_path):
with open(file_path, "r", encoding="utf-8") as f:
content = f.read()
# 「**Stock: n**」を正規表現で検索して更新
match_stock = re.search(r"\*\*Stock: (\d+)\*\*", content)
current_stock = int(match_stock.group(1))
new_stock = max(0, current_stock - quantity)
content = re.sub(r"\*\*Stock: \d+\*\*", f"**Stock: {new_stock}**", content)
with open(file_path, "w", encoding="utf-8") as f:
f.write(content)
# 在庫が0になった場合は購入ボタンをコメントアウト
if current_stock > 0 and new_stock == 0:
content = re.sub(
r"(<stripe-buy-button.*?</stripe-buy-button>)",
r"<!-- \1 -->",
content,
flags=re.DOTALL,
)
with open(file_path, "w", encoding="utf-8") as f:
f.write(content)
else:
print(f"Error: File {file_path} not found. Skipping...")
if __name__ == "__main__":
update_stock()import os
import smtplib
from email.mime.multipart import MIMEMultipart
from email.mime.text import MIMEText
import datetime
def create_email_content():
"""
メールの件名と本文を生成する関数
"""
# メール件名
subject = f"お買い上げありがとうございます [1x telescope]"
# メール本文は別添えのHTMLファイルから読み込む
with open(
os.path.join(os.path.dirname(__file__), "./email.html"), "r", encoding="utf-8"
) as f:
html_content = f.read()
return subject, html_content
def send_email(subject, html_content):
"""メールを送信する関数"""
# 環境変数から顧客メールアドレスを取得
customer_email = os.environ.get("PAYLOAD_EMAIL")
if not customer_email:
print("No payload email found.")
return
smtp_server = "smtp.gmail.com"
smtp_port = 587
smtp_username = "1xtelescope@gmail.com"
smtp_password = os.environ.get("SMTP_PASSWORD")
msg = MIMEMultipart("alternative")
msg["Subject"] = subject
msg["From"] = smtp_username
msg["To"] = customer_email
msg.attach(MIMEText(html_content, "html", "utf-8"))
try:
with smtplib.SMTP(smtp_server, smtp_port) as server:
server.starttls()
server.login(smtp_username, smtp_password)
server.send_message(msg)
print("Success to send email.")
except Exception as e:
print(f"Error: Failed to send email - {e}")
if __name__ == "__main__":
mail_subject, mail_body = create_email_content()
send_email(mail_subject, mail_body)TIP
上のupdate_stock.pyでは在庫が0になると購入ボタンをコメントアウトするようにしています。しかしボタンから飛んだ先の決済リンクは生きているので、これを自動で無効化するためにStripeのダッシュボード上アプリとしてStockifyを併用しています。
おわりに
カート機能などを実装するとなると多分サーバーが必要になるのですが、複数種類をまとめて購入される方はあまり居ないため現状これで十分かなと思います。
説明することが多くて随分と駆け足になってしまいましたが、何らかのお役に立てば幸いです。


